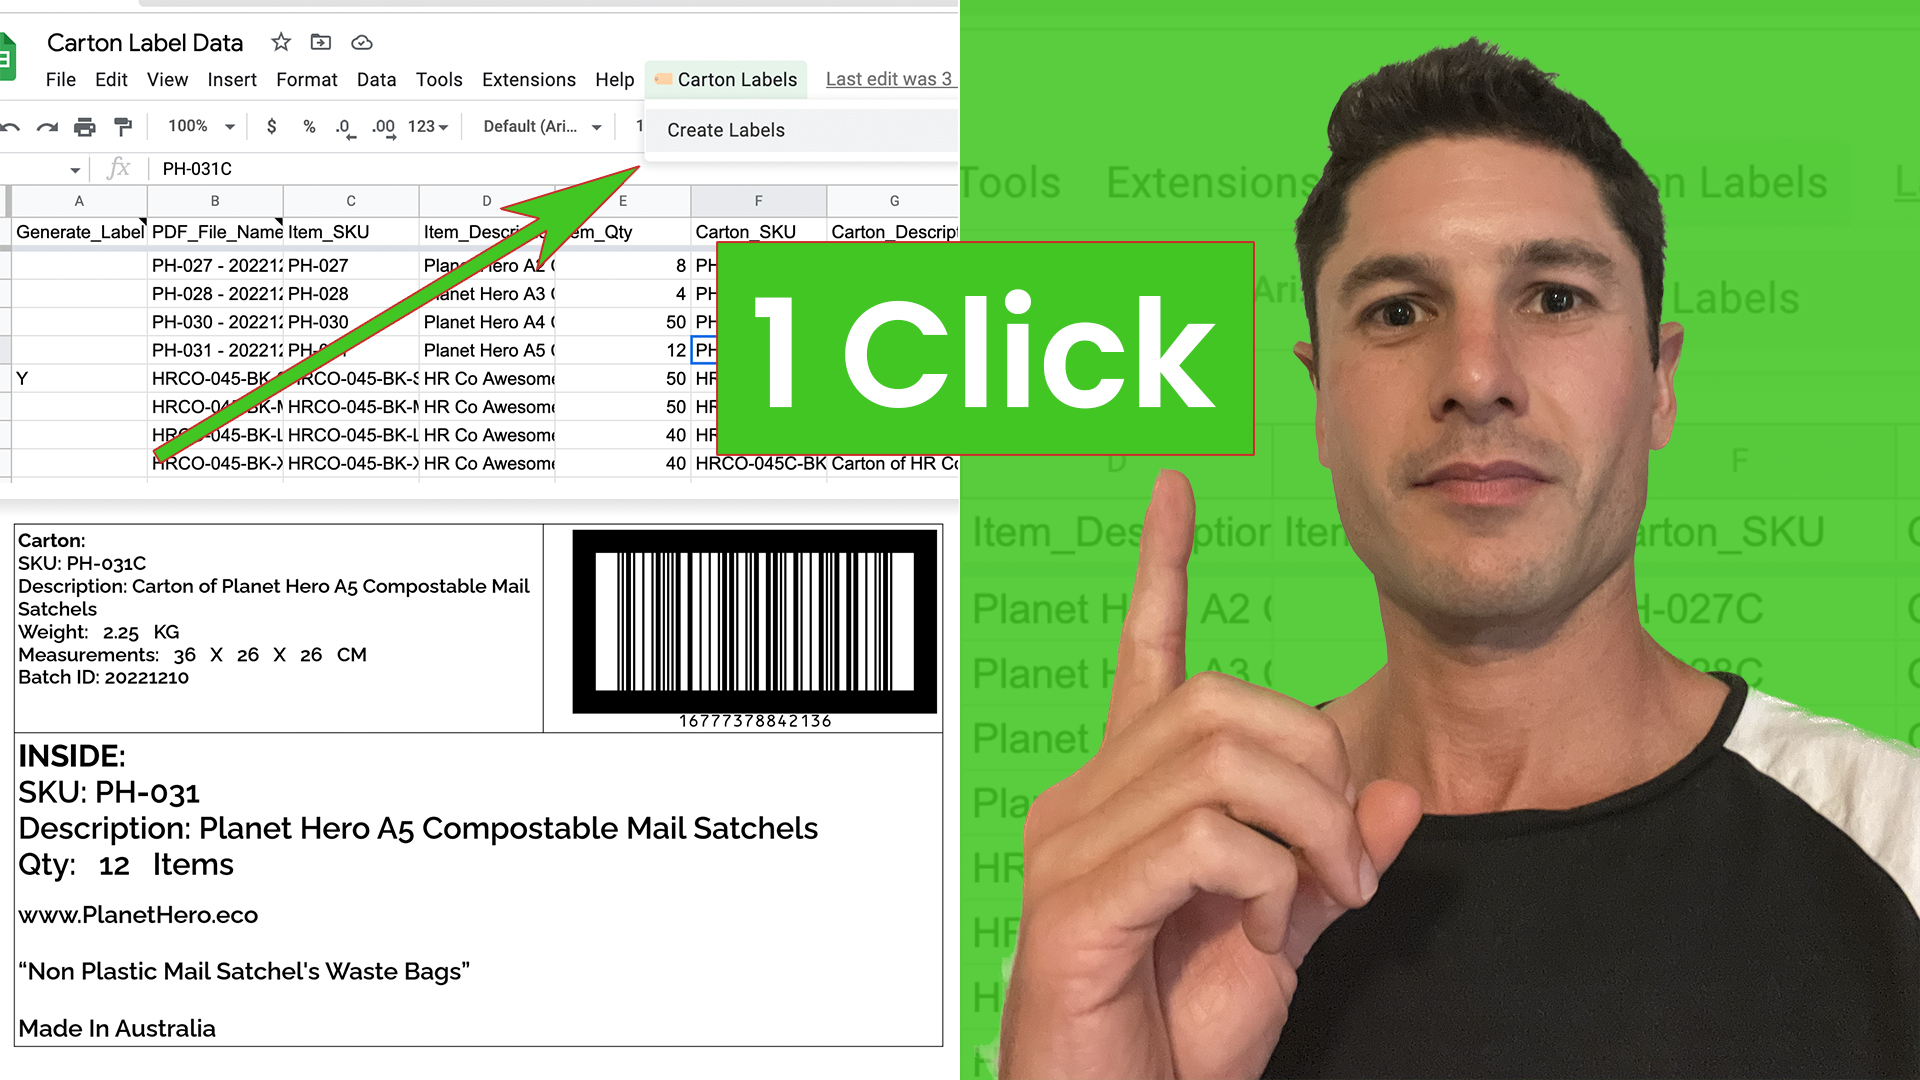
In this blog post, I’ll share a free product carton label generator. You can generate new carton labels from a template at the touch of a button with it. It also allows you to make updates to your template anytime you want.
If you run eCom businesses like me (Oh Crap & Planet Hero), you are probably creating new carton labels all the time. Over the years, I’ve tried everything from a word doc in the early days to more recently using Adobe Illustrator to generate product carton labels.
However, on each production run, we update our batch ID, which meant going in and editing lots of the templates one by one, which took a long time. Plus, we are adding a lot of new products, so I needed a way for anyone in the team to be able to generate labels without relying on me editing templates in Illustrator for each production run.
Watch the tutorial:
So I came up with a way of generating carton labels for free online using Google Sheets. Using the Google Sheets carton generator means anyone in the team can update carton labels in just a couple of clicks & they are super easy to maintain.
What Are Product Carton Labels?
You place product carton labels on the outside of product cartons. They typically contain essential information about the product, such as the product name, manufacturer, weight, and any relevant warnings or instructions. Plus, you are likely to include where the product is made and a short description for customs, e.g. ‘dog poop bags’, on them.
Why Are Product Carton Labels Important?
Carton labels are used to help identify and organise products and to provide important information to consumers. They are an essential part of the packaging process for many products.
Also, product carton labels help to organise products and ensure that they are correctly distributed and sold. By clearly identifying the product, carton labels help retailers and distributors stock and sell the product and ensure that it reaches the intended customers.
Thirdly, product carton labels can be a key part of product branding and marketing. They provide a visual representation of the product and the company that produces it and help to build brand awareness and recognition.
Also, in our case at Oh Crap & Planet Hero, we print a unique batch ID on each manufacturing run. The Batch IDs make each carton easy to identify in the warehouse at the carton level instead of having to unpack all the individual items inside to find the batch ID, making inventory management super easy.
How I Used To Manage & Maintain Carton Labels
Microsoft Word
In the early days, I tried using an MS word template to create a carton label. One plus was that anyone in the business could edit them. However, for each new production run, we had to go into each MS Word template and update the Batch ID, which got messy to maintain. If you only need to make one carton label, this can be a great solution that takes 30 secs to do, and they can easily be saved as a PDF.
Here is my template if you want it to create a one-off carton label: https://docs.google.com/document/d/1blr2VO41bHmp_mzLL_OppytLsoemd4hI/edit
Adobe Illustrator
I also tried making one giant Illustrator file with lots of artboards, each with a specific carton label on. However, as we added products, I ended up copying and pasting artboards endlessly, and there was no quick way to update batch ID’s on each label and export it. It also ended up being a mess, and I recommend not doing it this way.
Neither option was a good long-term solution. So recently, I came up with a way to create carton labels online using Google Sheets & Docs, meaning they can be easily maintained, generated & anyone and in the team can do it:-
Free Carton Label Generator
To maintain our carton labels long term and generate new carton labels PDFs at the touch of a button I coded a script you can use with Google Sheets.
How Does It Work?
It merges the information on your master spreadsheet with all your carton information to a carton label template created in Google Docs and then exports a PDF.
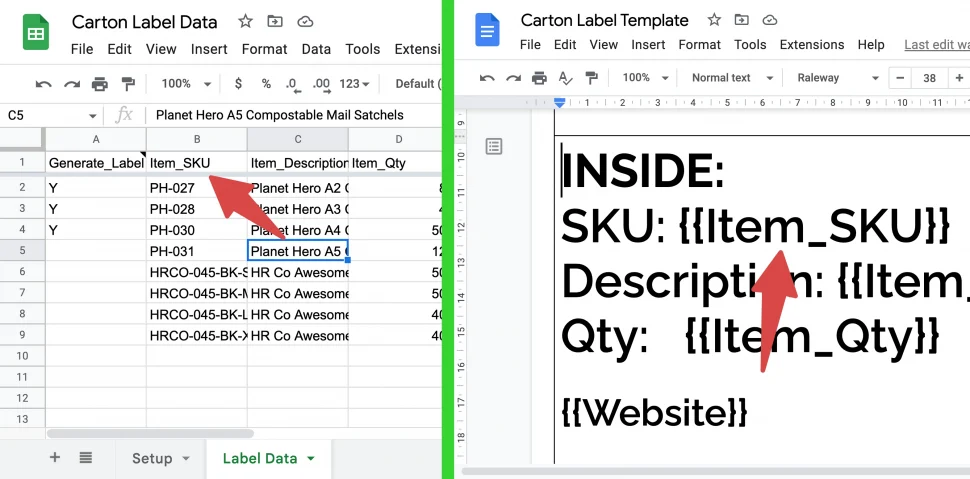
The script looks at the title of each column in the sheet. Then merges the information in the row into the Google Doc template. It simply looks at each title in the Google Sheet, and if a corresponding merge tag exists in your template with curly brackets around “{{“ “}}”, it merges that information & saves the resulting file as a PDF.
Setup The Files & Folders For The Carton Label Generator
The online carton label generator requires a couple of things to get it running:
1. Carton Label Generator Sheet
Download a copy of the carton label generator sheet here: https://docs.google.com/spreadsheets/d/1yZVnZuxi2iVzfNXODwv3GaidkrR6m7mnWWBzH_rBVpg
2. Carton Template Document
You can download my carton label template here: https://docs.google.com/document/d/13VtGldA5EbbKkau1mLL3s3bCtpgjIVdT5uzYbgIrXyc. I have left the table borders as black lines in this example so you can easily see how to edit it and resize the boxes to fit your needs. But I suggest changing them to white when you are happy with it. Or you can make your own template.
3. PDF Output Folder
Create a PDF output folder. This is the folder where the final PDFs will be saved.
When generating the PDFs, the script creates a copy of your carton label template for a couple of seconds to merge everything. This temp document is only stored for a few seconds in the PDF folder before being saved as a PDF, then is automatically deleted.
Quick Suggestion
I suggest setting up a folder exclusively for the task of generating the carton labels. Here is the folder I use for Oh Crap.
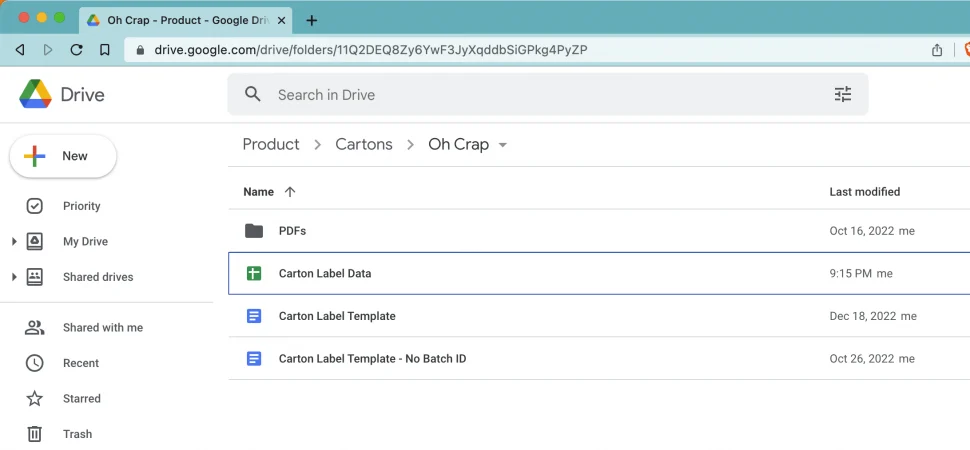
I created a public carton generator folder for this tutorial with all the above items you can use for reference: https://drive.google.com/drive/folders/1KlVCwt4OSFT9lcDmKf3YbuusheoQszDs.
Note: You can’t download the contents of this tutorial folder, as this will lose the script that is saved in the sheet – Instead, you must copy the sheet & my carton label templates to your drive directly and set up the folders manually.
Setting Up The Carton Label Generator Sheet
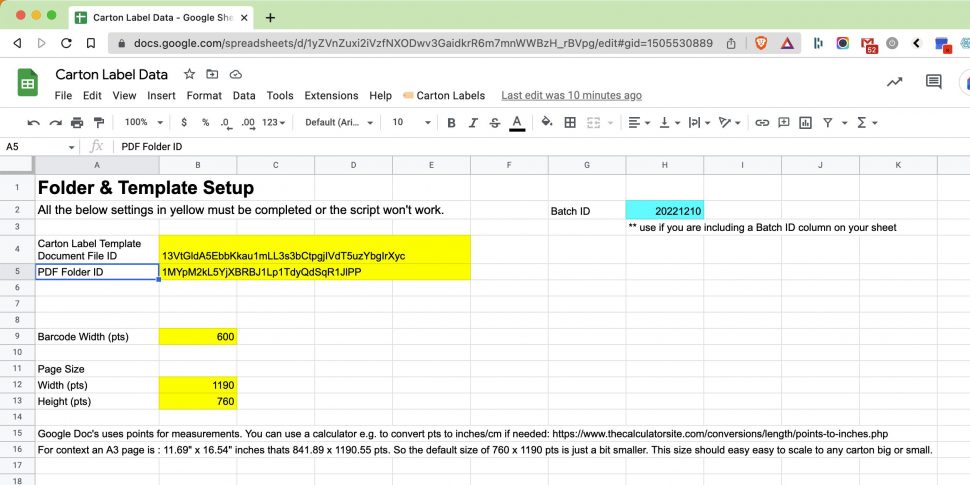
When you have copied the files and folders to your drive, open the sheet. On the first sheet titled ‘Setup’ you will see several yellow boxes you can edit. You MUST update the ID of the carton template document and the ID of the final PDF folder you have created. You can find the IDs of the document & folder by opening them in your browser and getting them from the URLs.


Setting the barcode size & document width and height can be a bit of trial and error. I’ve found that the measurements I have in there now work for our templates, but if you use a different design, you may want to change them.
Why the width & height settings? You can’t set custom document sizes in Google Docs, so you may end up with labels with lots of white space around your labels if your labels are different from the standard paper sizes pre-loaded into Google Docs. So the measurements are the output size of the PDF. The script first gets the template doc, then chops the final PDFs down to the size you set here. So if you need more space, increase the value, or if your template has too much white space around it in the final PDF, make these values smaller.
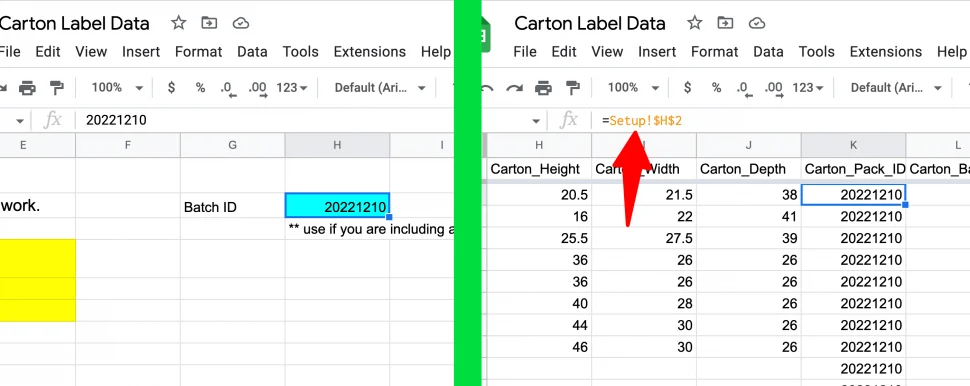
If you need to print a Batch ID on your carton labels, you can set the Batch ID to the ID you want to use for this set of carton labels. Then use that as a constant in the ‘Label Data’ sheet.
Add The Label Data
All label data is kept on the ‘Label Data’ sheet. All of the merge fields start from column C across.
Column A
Column A is reserved for you to add a Y for each row you want to generate a carton label for on that run. This is useful as you may not want to generate every carton label in your sheet every time you run it. If you don’t need to generate a label on this run, simply leave it blank. This column must be titled ‘Generate_Label’ as this is the name the script is looking for to know if it should create a carton label on this run.
Column B
In column B of the ‘Data Label’ sheet, enter the name you would like to call the final PDFs. I use the format: [Item SKU] – [Batch ID] – Carton Label. This column must be titled PDF_File_Name as this is the name the script is looking for to name your PDFs.
Including Barcode / Images
If you want to merge images into your carton template, such as barcodes, you can.
When you create your merge tag name, finish it with ‘_Img’ (case sensitive), and the script will know you want to output an image into the carton label. Then include the full Google Drive link of the barcode/image in that cell.
Google Docs only allows you to merge .JPG’s/JPEG’s and .PNG’s into documents – I strongly suggest using .PNG’s for the carton generator as they are the higher-quality image that will make your barcodes easier to read. If anyone knows how you can add .SVG’s or other vector formats into Google Docs, please leave a comment below, and I’ll add it to the script.
My workaround to ensure any image I merge into the document is as high quality as possible is to save them at 450dpi; then, when it’s merged into the PDF and printed, it should be crystal clear.
Notes: I have tested this script with images I have full edit access, and everything works as expected. I’ve also tested the script once with view-only access to an image, and it worked, but your mileage may vary. You will know if the script fails when it merges the image as it will simply stop the script and you will find the half-created copy of your template in the PDF folder. You don’t have to store the images in the same directory as this sheet ( I save our barcodes into their product spec folders); make sure it’s somewhere in the shared drives that you can access.
Also, i’ve found that the script doesn’t deal with images over 3000px in either direction very well, i’m not sure why, but my barcodes are normall around 1800px wide so it’s not an issue.
How To Generate The Carton Labels
When you have added all the information you would like merged into the final PDFs, add a Y in column A for all the labels you would like created. Click the ‘🏷️ Carton Labels’ menu item, then click ‘Create Labels’. This will generate the carton labels and save the PDFs to your output folder.
It takes around 20 secs for each label to generate & save, so be patient if you are creating lots of labels.
Like any Google Drive script, the first time you run the carton label generator script, you will be required to approve its access to your drive. Just click approve and then click the Create Label option again to run it.
Conclusion
In this article, we’ve gone through how to generate carton labels using Google Sheets. Not only does this make it easy to generate carton labels, but it should also make it a lot quicker to create the information that is required to go on each label.
You may have also noticed this script is essentially a merge sheet to PDF script, so it could be used to create anything that you need mail merged PDFs for. And you can easily add to the script to send the resulting PDFs in an email. Let me know if you want me to write that extra function.
If you have found this script helpful, feel free to share it with your friends in eCom, who might find this useful too.
If you have any other ideas to improve this tool, please let me know in the comments below. Or if you have any ideas of other tools like this, you would like to see & would help your business, drop me a message – I enjoy solving eCom challenges.


0 Comments