At present split testing automations in Active Campaign can’t be done with any of the default options. However, it can be done ;). So in this article, I will show you how you can split test Active Campaign automations.

It’s About Damm Time
Out of the box Active Campaign allows you to split test regular campaigns that are manually sent. However, there is no way of split testing Active Campaign automations. This is a bit of a bugbear for most serious marketers who use AC like me, because as we know, ‘the money in the list’.
The easiest way to improve your marketing efficiency is to be split testing key touchpoints through your marketing. So yes, until now we have been able to split test manually sent campaigns. However, you can’t truly automate your business without automating your email marketing. And most of the money emails we send are automated. So these are the ones that need to be split tested to make the big difference on our bottom lines.
[hrm_optin_2_step href=”https://hrmedia.leadpages.co/leadbox/1459ba173f72a2%3A175dec95fb46dc/5691878833913856/” type=”solidbanner”]Download the free WordPress Plugin to start split test AC automations right now[/hrm_optin_2_step]
In this article, I will take you through basic and advanced ways to set up split testing in Active Campaign automations. Plus my free WordPress plugin to allow no-coders to implement the Advanced method. And how to split test an automation in Active Campaign.
Basic: Split Test Active Campaign Automations Set Up
Process: Time-Based IF Statement
The first step in creating split testing automations in Active Campaign is to divide your contacts up. This allows you to put one-half (or your desired ratio) through one variation in the other half through another variation.
There isn’t an option by default to tag or divide new contacts up into two equal sized groups. So instead, we will divide them as close to equally as possible using the time of day they optin as a way to classify contacts.
To do this, we need to setup an automation that runs every time a brand-new contact is added. We will divide them based on the hour of the day they opt-in to our list. We will assign a tag of Split A to contacts that opt-in in an even hour, and assign a tag of Split B to contacts that opt-in in an odd hour.
Note: We could also use custom fields, but I find tags give you that extra 1% flexibility when it comes to segmenting and dividing up contacts.
So the times of day will end up relating to below tags:
| Split-A | Split-B |
| 12am | 1am |
| 2am | 3am |
| 4am | 5am |
| 6am | 7am |
| 8am | 9am |
| 10am | 11am |
| 12pm | 1pm |
| 2pm | 3pm |
| 4pm | 5pm |
| 6pm | 7pm |
| 8pm | 9pm |
| 10pm | 11pm |
Unless you have a website that is only live on even hours, this division of your contacts should result in about a 50-50 split.
We can then use the split tag as a way to count people in or out of the condition later on.
Method
You can view the video walkthrough of the below basic method of setting up split testing in Active Campaign automations here:
(Can’t see the above video? You can check it out here.)
To set this up in Active Campaign, we first need to go to the automations menu and create a new automation. I then named the automation ‘Tag – HR – Split Contact’, but you can name it anything you want.

Create New Automation in Active Campaign
We want this automation to run every time a contact is added to any list. So when you get the popup ‘How will a contact enter your automation?’ select ‘Subscribes’.
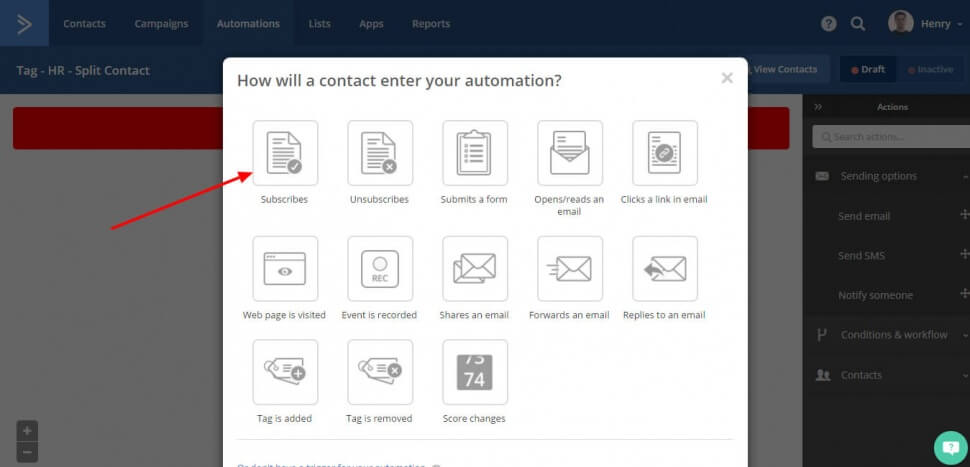
Kick Off Automation When Contact Subscribes
Now in the action options screen choose the ‘Any List’ from the select list option, and select ‘Once’ from the Runs option. Then click add start to create the rest of the automation.
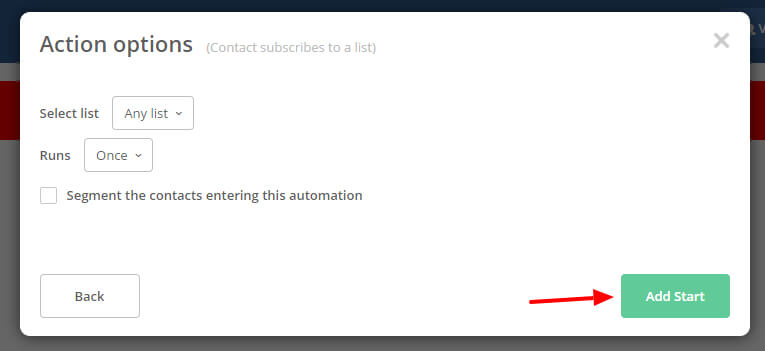
Action option
Now we can begin adding decision nodes to the automation.
First we need to add an ‘IF / ELSE’ node to check if the contact already has a split test tag or not. We do this by setting the condition ‘if tag Split-A or Split-B exists’.
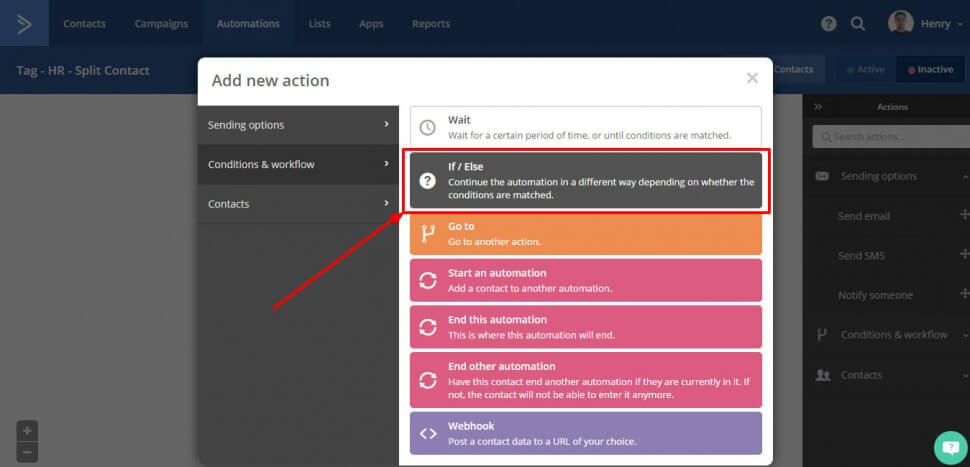
Adding If / Else Action
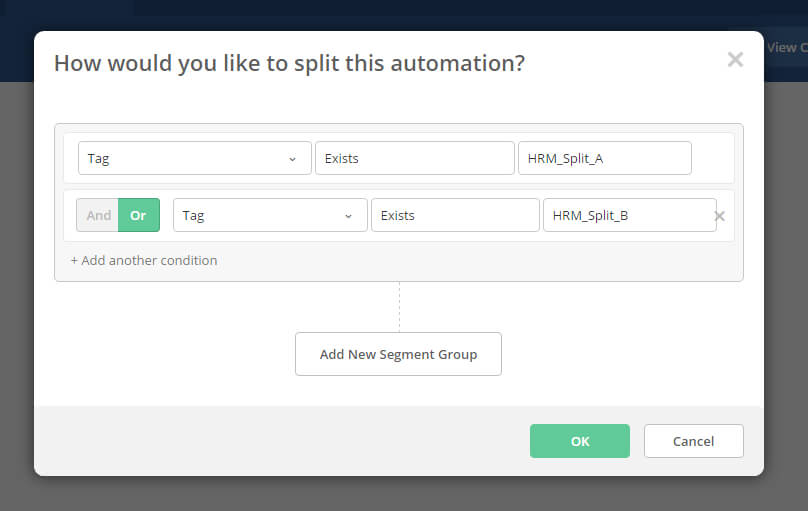
Look for Tag’s in Contact Records
This means we can then filter out people who already have a split test tag. We then end the automation for people who have the tag by adding an ‘End Automation’ node.
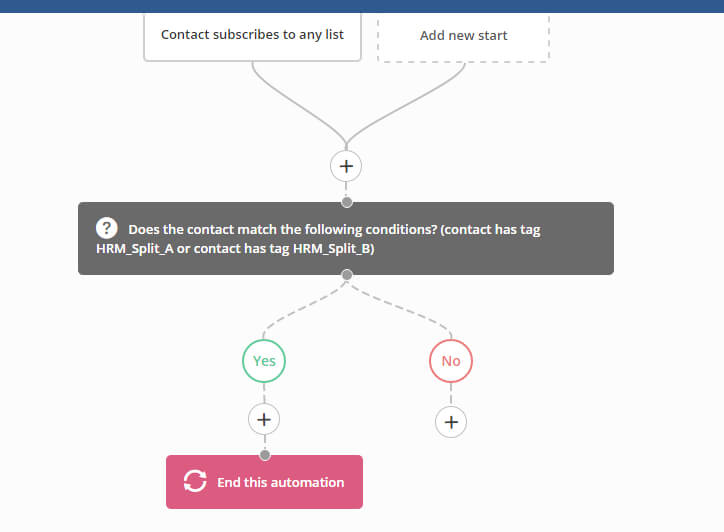
End Automation If Tag Exists
This just leaves us with the contacts that don’t have a tag.
So we can now set up a time-based IF statement to divide the contacts up by time. So as mentioned above, we will set this up based on the hour of the day the contact opt-in. When adding this it is best to use the current time in a single location, so in my case, I am using the ‘Current time (Europe/London)’ option.
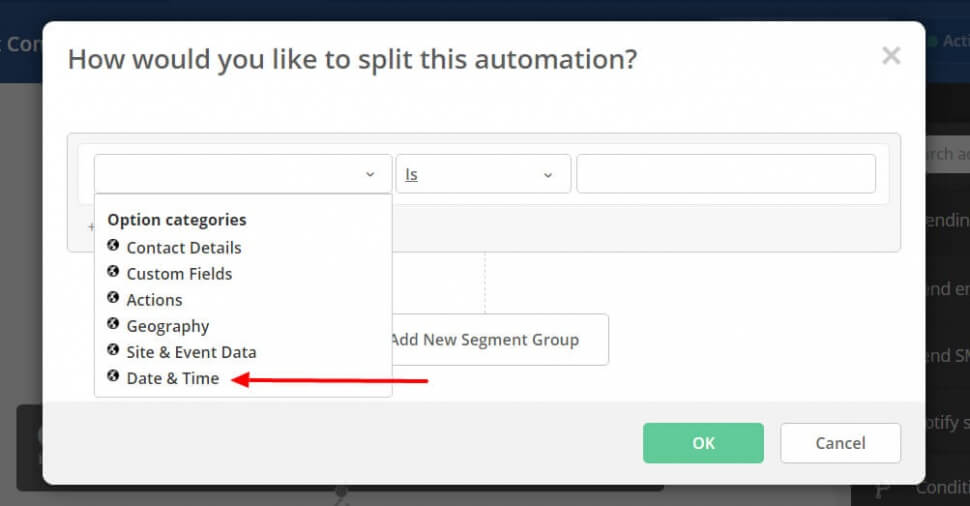
Date & Time
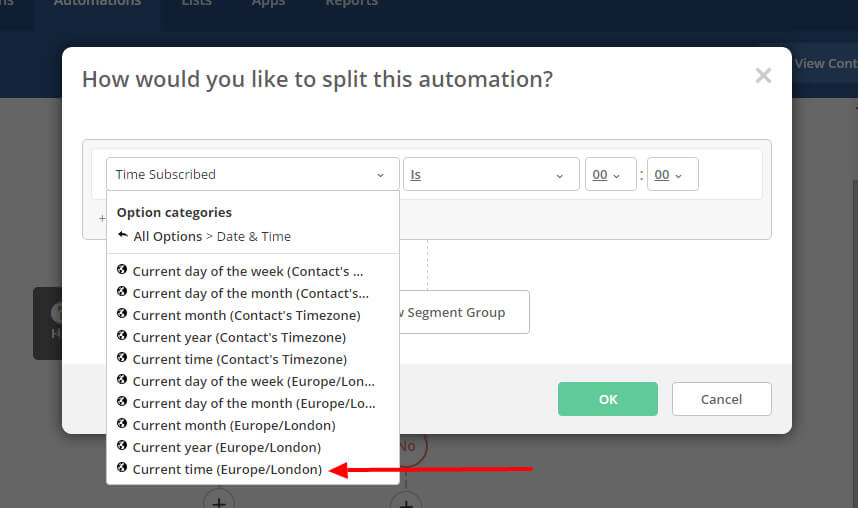
Split By Current London/Europe Time
Now we want to include ‘Is’ ever even hour, so 12 am, 2 am, 4 am and so on.
(Note: unless you have a huge monitor the editor will end up going off screen. So to see the options as they go below the visible screen zoom out on your browser, that can be done by using the keyboard shortcut PC: CTRL – or on Mac: Command – )
After adding all the even hours of the day, it will look like this:
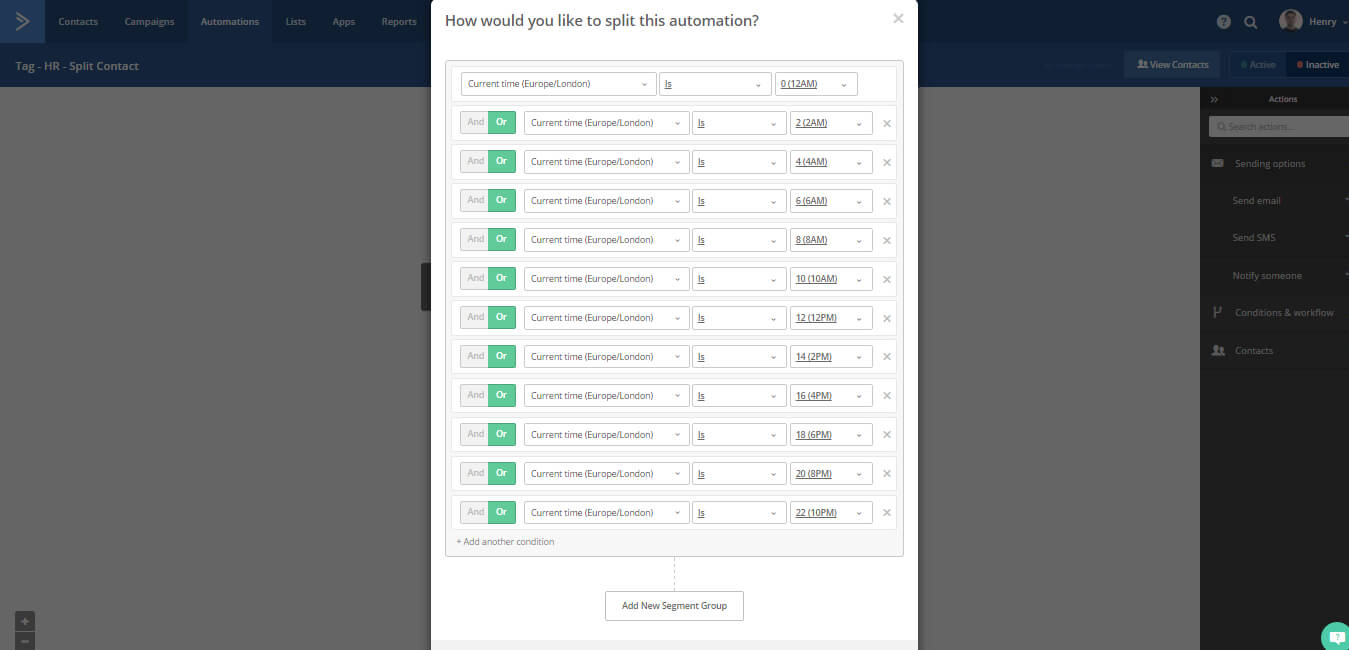
All even hours
Now we have a statement that put’s all of the new contacts that come in, during an even hour into the ‘Yes’ option. And the opt-in’s during an odd hour into the ‘No’ option.
Now we just need to add a tag to differentiate the contacts each option. So in my case, I’m going to add ‘HR-Split-A’ and ‘HR-Split-B’.
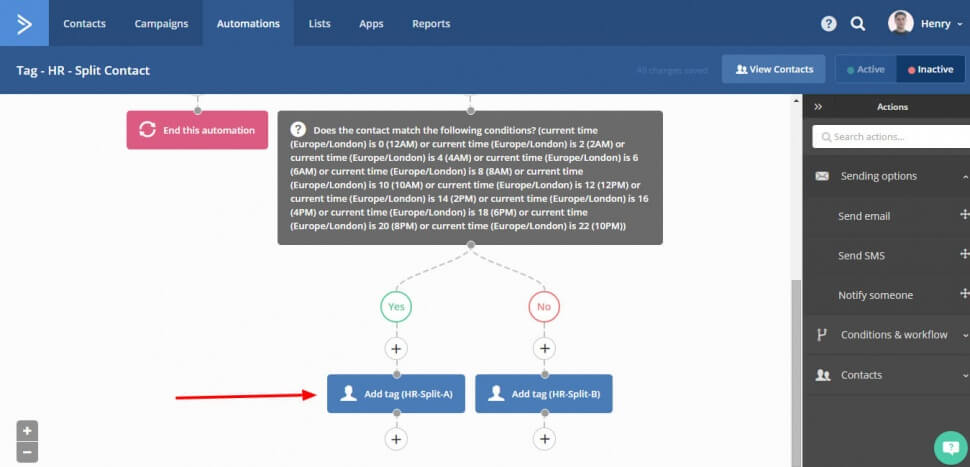
Almost Finished Time Based Split Of Contacts
Now we can end the automation as the tags have been added.
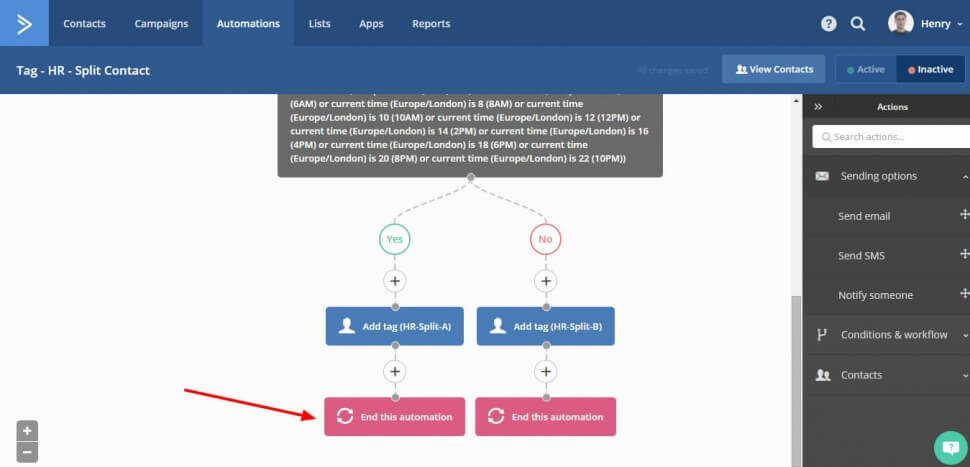
End Automation
Now we are all set up, to active the automation you just need to click the active button in the top right-hand corner.
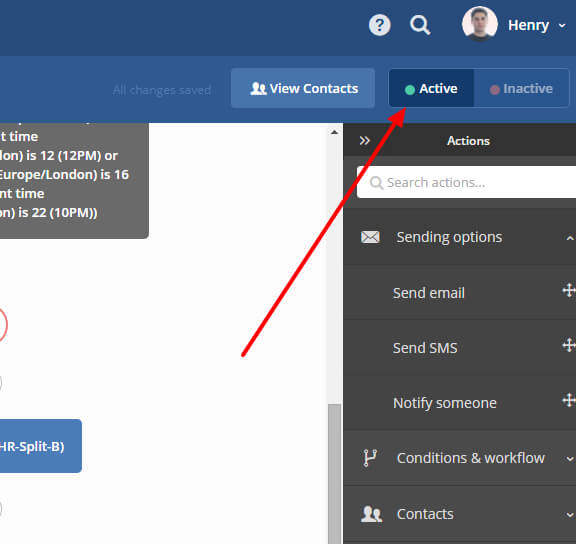
Activate Automation
Every new contact that does not have a split testing tag will have a tag added, so you can split test automations in Active Campaign.
Free Active Campaign Split Testing Automation
This can take a bit of time to set up so if you would like to import my pre-made automation by clicking here: http://tplshare.com/H0$9mrv. (Remember if you change the tags that are assigned to the contacts you will also need to update the first IF/ELSE statement to check for your tags).
Advanced: Split Test Active Campaign Automation’s Set Up
User ID’s, Webhooks and The API
The above method based on time-based dividing of contacts works well and is something I have set up in the past for Clients. However, having worked with them for a bit, as I expected the ratio of contacts with one tag vs. the other wasn’t too close to the 50/50 mark. And as a marketer who is good with split testing and data analysis, isn’t a setup I liked.
So I came up with a more advanced setup that can be used to equally divide contacts. This involved using the Active Campaign API so if code isn’t your thing I will try and keep this as easy to understand as possible.
Method
Like the basic setup, we need to create a new automation and start it whenever anyone subscribes to any list. The start of your automation should look like this:
Next we need to check if the contact already has a split testing tag as before. Again we want to end the automation for anyone who already has a split testing tag. So your automation will now look like this:
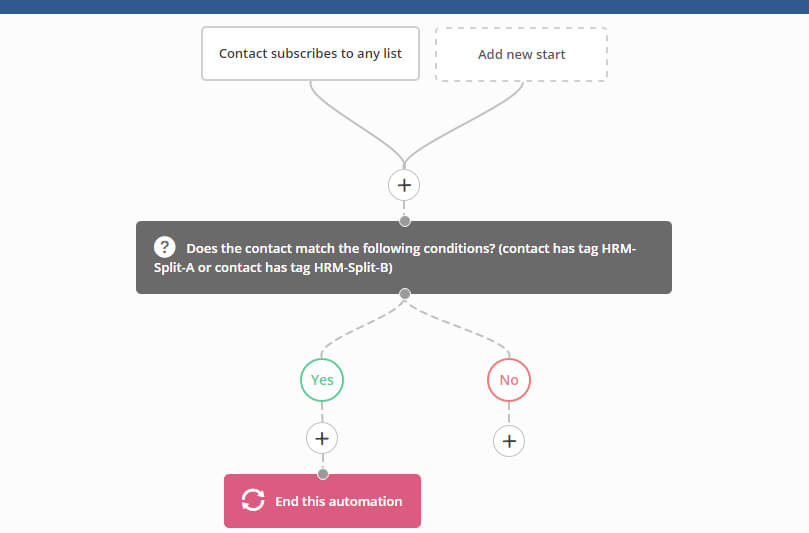
Basic split test automation setup
Now comes the interesting part. We can now quit the automation as is for now. And now create a new PHP file to we can work with data from webhooks and the Active Campaign API.
In human language what we want to write a script that does this:
- Get data from the Webhook.
- Include and set up the Active Campaign API
- Make the Webhook data into a queryable variable
- Get the users Active Campaign contact ID and email address from variable data
- Work out if the user id is an odd or even number and then add a tag to the contact and send the data back to Active Campaign.
So let’s set this code up.
1. Getting data from the Webhook
We need to add the tag at the start of the document to start the php and then add:
https://gist.github.com/76c87fdf5b1cbe268615.js
This will now receive data from our Active Campaign Webhook.
2. Include and Set up Active Campaign API
Now we can include the Active Campaign API into the php document by using this code:
https://gist.github.com/65a40bb009e19dd921d3.js
3. Make The Webhook Data Into a queryable Array Variable
We can do this by adding this line:
https://gist.github.com/30651e260dd40088c9f1.js
4. Get the Users Active Campaign Contact ID and Email Address From Variable Data
Now we need to query the array to get the data we want and store it in a variable so we can use it later.
https://gist.github.com/2249dda23aaae71e8cb1.js
5. Assign Appropriate Tag
We can do this by first checking if the contact ID is odd or not. And if it is an odd number we will assign it Tag A or if it is not we will assign the contact Tag B.
https://gist.github.com/7d6d3ea7c267293689f5.js
The Full Php Script
So having put all of the above code together it will look like this:
https://gist.github.com/24b2129c165aded33413.js
Now with your full script, you can upload it to your web server e.g. http://mydomain.com/thescript.php. This will allow you to link to it from the Webhook in the Active Campaign.
Attention: As noted on Facebook by Edwards Haskins in this thread, including your API details on a publicly assessable server could be a security risk. This is why you should either:
- Recode the above script a bit so it can only be executed and not viewed,
- only use it behind a firewall and redirect the webhook,
- or last and my option, use it in a WP plugin, so your API key’s are stored separately in a database.
Back to the Automation
We should have left it looking like this:

Basic split test automation setup
Now with the script set up, we can now send contacts that don’t have either tag to the script via the webhook function.
So to do this, we want to add a Webhook node to the no decision tree.
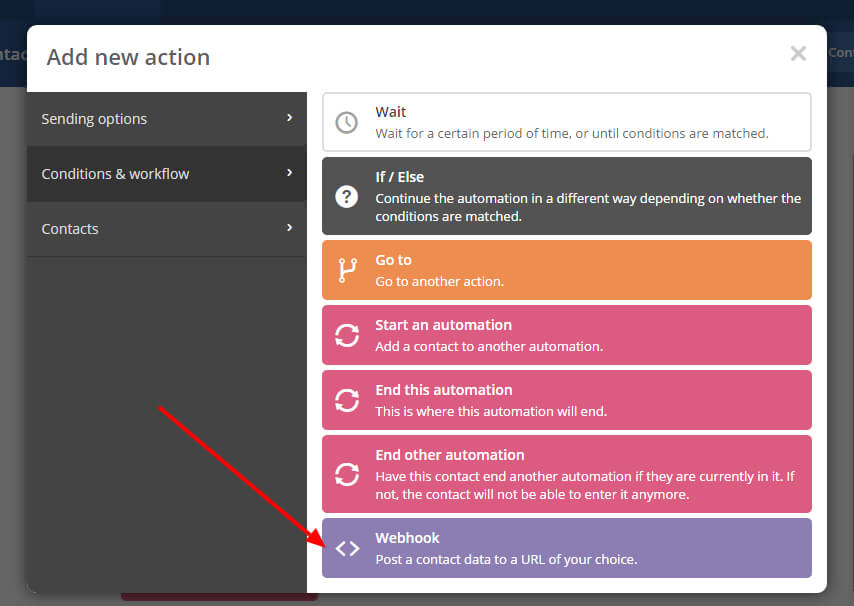
Add Webhook Action
And when prompted to add your URL you can enter the full URL to your script. So in this example it’s http://mydomain.com/thescript.php.
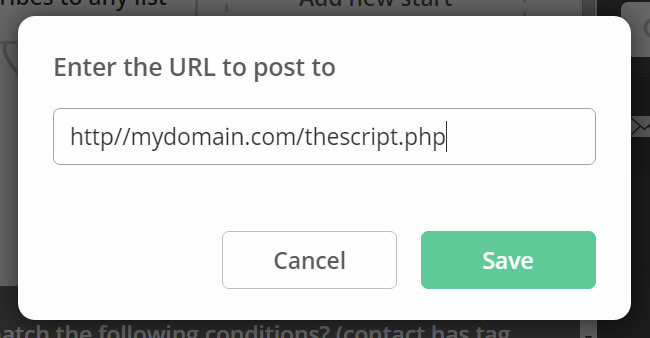
Add your webhook URL
And now we can end the automation. It should look like this:
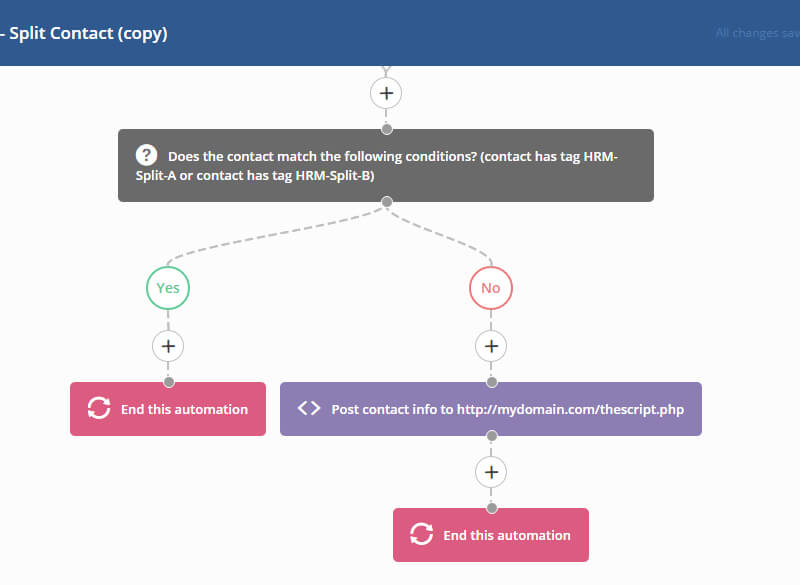
Final automation with Webhook
We are now finished creating this automation. Every time this automation is triggered and a contact is sent to your script; the contact will then be assigned a tag of either Split-A or Split-B.
If you would like to download the full automation, you can get it from here: http://tplshare.com/mmZeI4H.
And if you would like to download the entire script including all the Active Campaign API files you can view it GitHub or download it as a .zip.
Free Advanced Method WordPress Plugin
Upfront: This plugin is distributed in the hope that it will be useful, but WITHOUT ANY WARRANTY; without even the implied warranty of MERCHANTABILITY or FITNESS FOR A PARTICULAR PURPOSE.
If you aren’t a coder but want to use the advanced method for perfect division of contacts I have created [hrm_optin_2_step href=”https://hrmedia.leadpages.co/leadbox/1459ba173f72a2%3A175dec95fb46dc/5691878833913856/” type=”text”]this free WordPress plugin to take care of call the coding for you.[/hrm_optin_2_step] I use this on my client sites and it’s so easy to get people up and running with this advanced method.
[hrm_optin_2_step href=”https://hrmedia.leadpages.co/leadbox/1459ba173f72a2%3A175dec95fb46dc/5691878833913856/” type=”solidbanner”]Download the free WordPress Plugin to start split test AC automations right now[/hrm_optin_2_step]
All you need to do is [hrm_optin_2_step href=”https://hrmedia.leadpages.co/leadbox/1459ba173f72a2%3A175dec95fb46dc/5691878833913856/” type=”text”]download it [/hrm_optin_2_step] and activate it as you would with any WP plugin, and you are away.
Note
As the advice in the video above, I strongly suggest you install this on a separate WordPress install than your main website. As you know website loading time dramatically effects conversations. One of the easiest ways to speed up WordPress is to remove unnecessary plugins and this plugin falls into this category. The plugin is just an easy way to accomplish the script above without having to know your coding, and does nothing to the actual front end of your site. By itself it will not slow your site down, however it’s always best to follow good practices and try to keep your main website as plugin free as possible!
Split Testing an Active Campaign Automation
Now all of the contacts are being split into two groups we can now create split tested automations. We can split test everything from email titles to wait time between emails.
Split Testing Email Titles
Let’s say we have a sales sequence made up of 4 emails that are sent after a webinar is attended. The sequence might look like this:
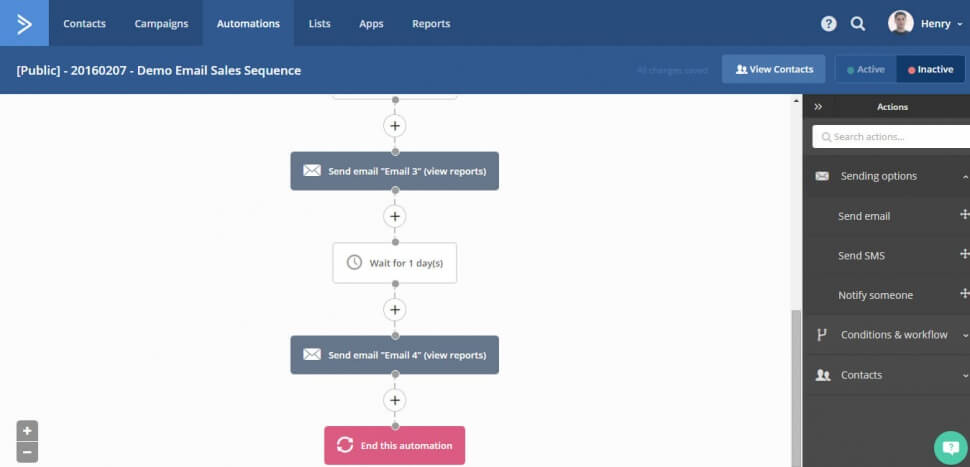
Standard Automated Sales Sequence
After letting 1000 people run through the automation, we do the numbers. We notice that 81% people open the first 2 emails in this sequence, but the 3rd email open rate drops down to just 54%, so we want to split test it.
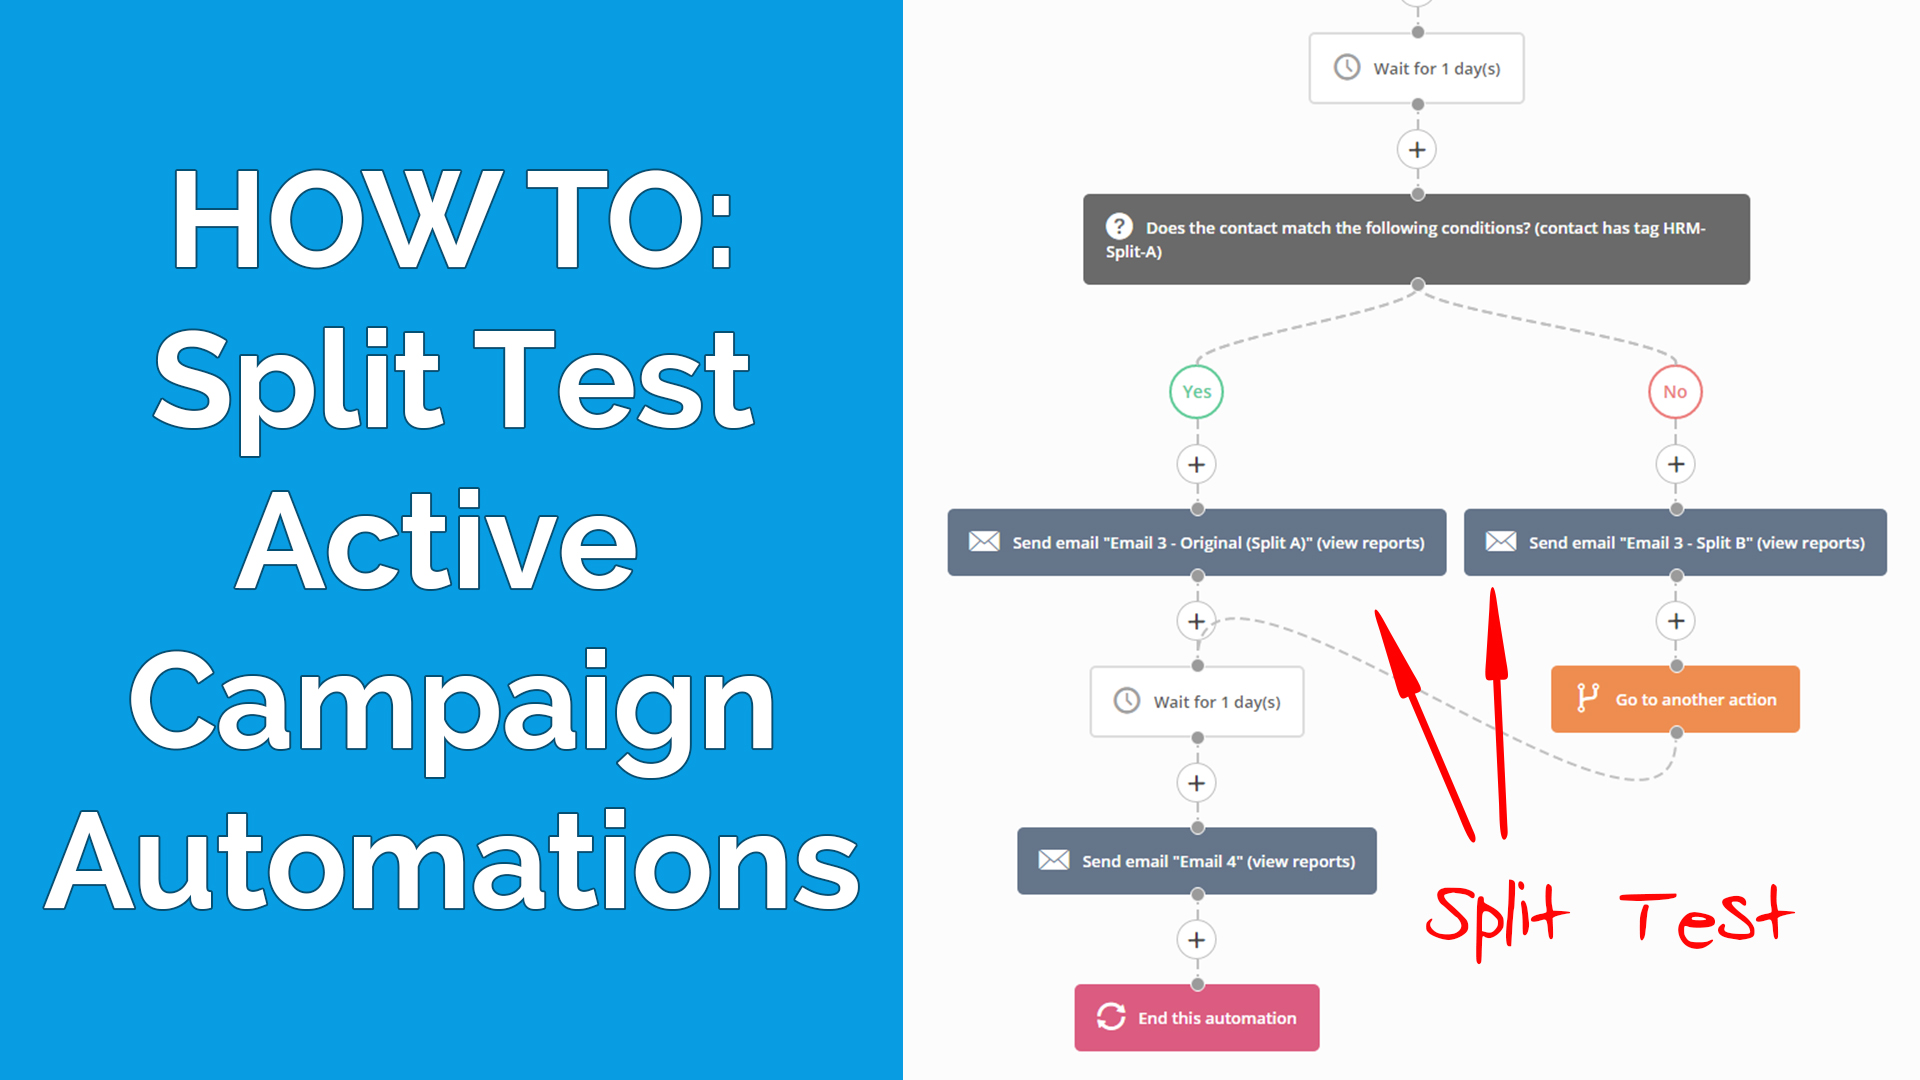
So to split test email 3 in the sequence, we need to put an IF / ELSE node in after email 2 and the wait. In the IF, we want to check if the contact has the a Split-A tag or not.
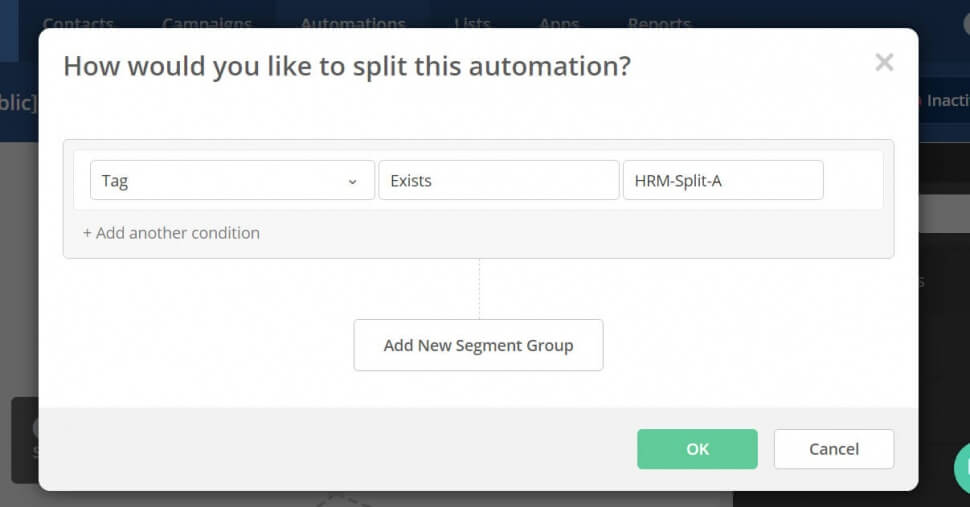
Does a split testing tag exist
Now we can add the alternate email and then add the ‘Go to another action’ to connect the sequence back up to the original sequence.
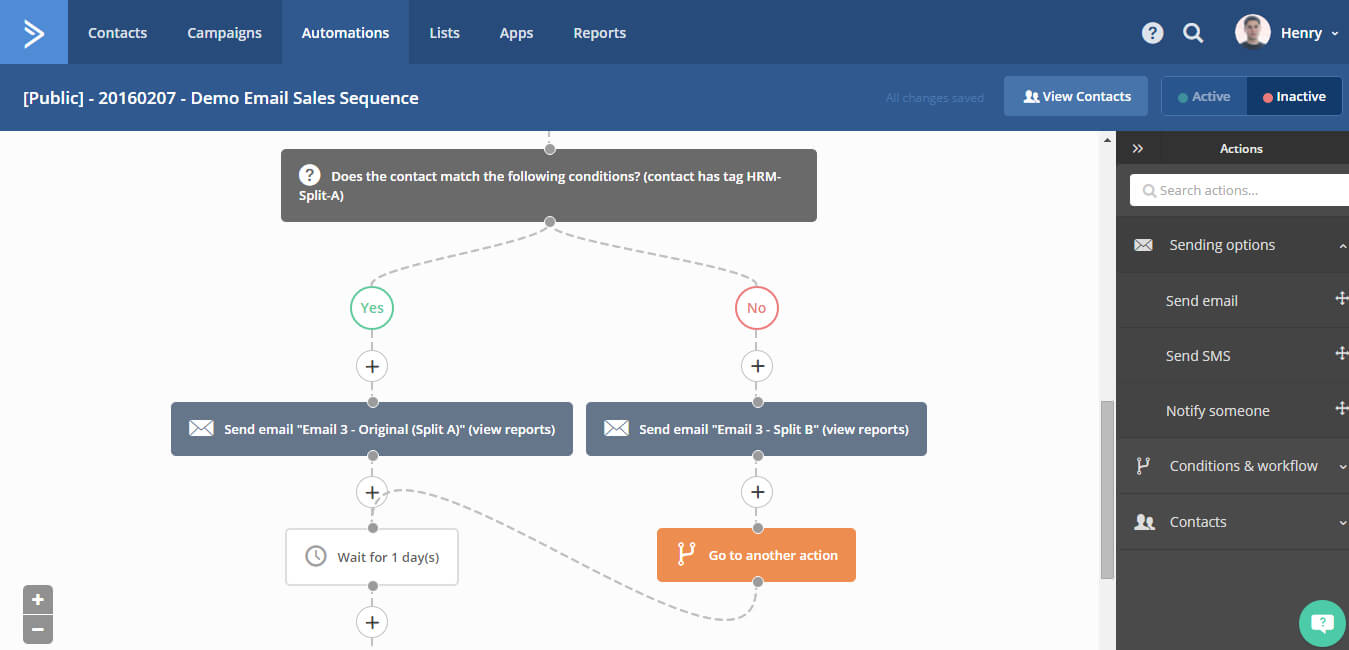
Complete Automation With Split Test
This idea of using IF / ELSE nodes and checking for a split tag can be used for split testing anything from email titles and content to wait times between emails.
Adding Tags to Current Contacts
The above process is excellent for getting new contacts into the split test tags, but what if you want to tag everyone.
To add old contacts to split tags is simple. Create an automation sequence similar as we did for the advanced split testing to send a contact via Webhook to the split testing script.
However instead of kicking the sequence off when someone opt-in to a list, start the sequence off when a tag is added. For example, You could set the tag as ‘No-Split-Tag’.
The full sequence could look like this:
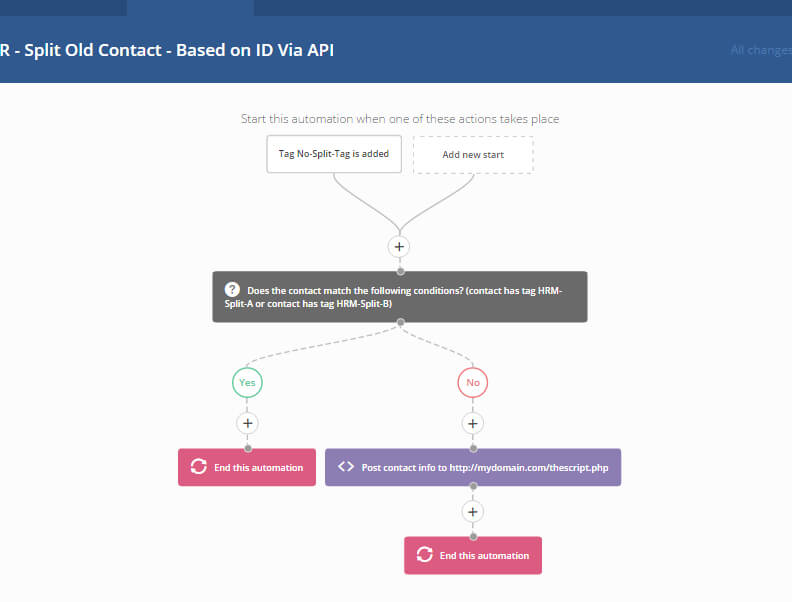
Start automation if tag is added
Now if you already have and split test tags, you might want to delete them, so you don’t get duplicate tags on some contacts. Next select all of your contacts from the contact section and tag them ‘No-Split-Tag’. By doing this, you will trigger the automation. This will send them to the Webhook and done, 5 minutes later all your contacts are updated.
Note: I have tried this with my list of just over 7,000 and it worked, and on my clients lists and it’s worked fine. However if you try to put 20,000 contacts through at once, it might kill your server (as that’s 20,000 page loads via the Webhook in just a few seconds). Instead of potentially overloading your hosting, I would update your list in 5,000 contact batches as good hosting should be able to cope with that.
You have the option of either adding a remove ‘No-Split-Tag’ tag node at the end of the automation or just manually remove it after you have completed the update.
Taking Active Campaign Automation Split Testing Further
The above methods are split testing are a start and will work in 95% of cases. However, this can easily be taken further to get perfect 50/50 (or desired ratio) on individual automations. It just a case of using some custom fields and the api and anything can be perfectly split tested.
I split test individual automation regularly and have found there isn’t much more effort involved so vs. the rewards going that extra mile has been worthwhile.
Conclusion
Through this article, I have taken you through two methods to set up split testing Active Campaign automation and show you how to set up a split test.
Enjoy implementing split testing in your Active Campaign automation’s and continually improving your automated business.
Let me know in the comments what your thoughts are and the result you are getting by using split testing?


Downloaded the plugin – and nothing happens (just a thank you). Where is the file?
I see – came by email. A line more to announce that in the thankyou page would be helpful. Thanks.
My apologies, Totally agree. I am recording a better thank you and welcome series today.
The automation fires, the webhook url is copied, the API url and API key also, tag is identical in the plugin and in AC – but no tag is set.
How can I see if the script a) receives data b) sends data back, or how can I test this?
Kind regards
Martin
Hi Martin,
Please, could you clarify what you mean by ‘no tags set’? Are new contacts not getting tagged, or have old contacts not been updated?
By the sound of it you have all the information you need in there, so it should work to tag all new contacts. However, unless you send all your current contacts through the automation they will not automatically receive tags.
I have added the AC automation entry “when Tag [Status] Aktiv is set start the automation’. Then I choose a contact, delete the Tag [Status] Aktiv and set it again. In the activities record I see > Entered automation [Split-A-B], then > Completed automation [Split-A-B].
But there is no Tag [Split-A]. or [Split-B]. in the contact.
So my question, does the data goes back and forth?
Another BIG problem: I work with OptimizePress and OptimizeMember. When your plugin is active, then I can not click on any menu in the dashboard of OptimizePress and OptimizeMember.
So I will have to deactivate your plugin – or do you have a better option?
Kind regards
Martin Thomi
Hey Martin,
Understood, I’m not sure I can diagnose it from the outside. I will send you an email to follow up.
As i say above, the preferred way to implement the script is just by using the php script as shown above. I have found a few UI bugs with it, so I have fixed a few things on my dev server, so I will be sending that out in the next week or so, that will fix all of the UI bugs we have found.
Or as I suggest in the article, it is best to install plugins that do not contribute to the working of your website on a subdomain WordPress install. This is because as a marketer I am very focused on website speed, so the less plugins you have on your main site the better. And then I have a separate WP install just for my scripts and any extra things i want to run.
Will be in touch over email.
Henry
Hi Henry,
I have just tested this out, and the plugin works (simpler than worrying about coding, which I could have done too)
Thanks for taking the time and effort to do this. Good Karma.
You might be interested in the little TamperMonkey scripts I developed for AC, to make the tabs more friendly.
LInks here: https://community.activecampaign.com/t/tabs-page-title-suggestion/1624
Cheers
Craig
Hey Henry,
So I got an error with the plugin, causing a javascript error
“Uncaught TypeError: $(…).tabs is not a function”
Which seems to be caused by your js file being loaded on ALL admin pages.
I fixed this by adding
“if ( ‘options-general.php != $hook ) {
return;
}
”
To class-ac-automation-splittesting-admin.php on line 116 (or at the top of “public function enqueue_scripts() “)
This stops the js being loaded on other admin pages, where I was getting an issue.
Untested at this point for functionality on your plugin, but fixed my issue with js not running in another plugin.
Cheers
C